Skip to main content Skip to main content

In-Wall Installation Guide

+ Download the PDF guide

Descarga el PDF en español

PATENTS

Installation

This equipment is not designed for maritime use or for use in mobile installations such as caravans or aircraft, except under certain conditions. Contact the Vaask Technical Service Department at +1 (512) 956-7687 with specific requirements.

Inspect the dispenser for transport damage, and do not install or use a damaged unit.

Contact Customer Service at +1 (512) 956-7687 if you find damage.

Electrical Safety

Before installation, make sure the voltage and frequency listed on the data plate match that of the electrical supply. This data must correspond in order to prevent injury and machine damage. Consult a qualified electrician if you are unsure.

To guarantee the electrical safety of this appliance, it is imperative that continuity exists between the appliance and an effective grounding system. If you have any doubt, get a qualified electrician to check the electrical system of the facility. The manufacturer cannot be held responsible for damages caused by the lack or inadequacy of an effective grounding system.

Before installation, service or replacing parts, disconnect the power supply to the work area by manually “tripping” the circuit breaker. This step is not required when refilling the sanitizer tank.

Disconnection method for fixed wiring must be incorporated in accordance with wiring rules that apply to the location where installation, service or parts replacement occurs.

Do not use an extension cord to connect the unit to electricity. Extension cords do not guarantee the required safety of the appliance.

Descarga el PDF en español

For Countries Not Covered by the European Union

This appliance is not intended for use by people (including children) with reduced physical, sensory or mental capabilities, or lack of experience and knowledge, unless a person responsible for their safety has given them supervision or instruction concerning the use of the appliance. Children should be supervised to ensure that they do not play with the appliance.

For Countries Covered by the European Union

This appliance can be used by children age 8 and older and by people with reduced physical, sensory or mental capabilities, or a lack of experience and knowledge, only if someone supervises them or instructs them on the safe use of the appliance and the user understands the hazards involved.

Children shall not play with this appliance, nor shall they clean or maintain the appliance, without supervision.

To prevent accidents and machine damage, read these instructions before installation or use.

For help, call +1 (512) 956-7687 or visit vaask.com.

Dimensional Drawings
and Parts

Tools Needed

What's included in the box

Choosing your installation location

• Power to the desired location must be 100 to 220V single-phase AC, 0.25 amp, or Power over Ethernet that meets standards 802.3af or 802.3at.

• Minimum dimensional requirements must be met.

• You must supply conduit and wire for the electrical connection.

• Ideal installation locations include columns, walls near doors and walls outside restrooms. Fixture should be installed in drywall.

• The National Fire Protection Association requires that sanitizing dispensers be at least 1 in (2.5 cm) from any ignition source, including outlets, and cannot be located in the area directly above an ignition source.

Installation Instructions

1. Identify power source. This could be a nearby plug outlet, a junction within a drop ceiling or PoE ethernet port. Unit does not require a dedicated circuit.

2. Make a plan for getting power to installation site. Buy supplies needed to make the connection.

3. Run electrical to install location. Perform the following steps before the wall façade is installed.

For AC power: Turn off electrical power to the installation circuit by tripping the breaker and locking it out

• If you are installing for a retrofit and need access within the wall cavity before running power, skip to step #1 and then return here after completion.

• For AC power: Within the wall cavity, run single-phase AC electrical wiring from the nearest junction box or electrical panel to the planned installation point for the Vaask fixture. If using conduit, make sure it’s flexible conduit.

• For Power over Ethernet: Run a PoE cable from your Ethernet power sourcing equipment to the installation wall cavity.

NOTE: If you are running power for a Vaask unit that will not be installed until after the building is occupied, stop here. When the unit arrives, proceed to Step #1.

Cut the hole

STEP 1: Locate the studs on either side of the desired installation location. Optional: Use a stud finder. Mark with painter’s tape. Ensure there is at least 9.6 in (24.4 cm) of lateral space between studs.

STEP 2: Mark the bottom edge of the fixture cutout 32-42 in (81.3-106.7 cm) above the finished floor, according to design preference and local codes.

STEP 3: Cut a hand-sized inspection hole in the center of the preferred installation location. Optional: Use an inspection camera to determine what is behind the wall. Ensure that the depth between outer wall surface and the next flat surface inside is at least 3.5 in (8.9 cm) and that there are no obstructions within the wall cavity.

STEP 4: Using tape, attach the enclosed 9.6 in (24.4 cm) x 14.5 in (36.8 cm) template to the wall where you want to place the Vaask fixture. Use a bubble level to ensure that it is level.

STEP 5: Draw around the perimeter of the template with a pencil.

STEP 6: If the wall surface is already painted, protect the paint by taping to the outside of the drawn line with painter’s tape.

STEP 7: Carefully cut out the drawn rectangle with a rotary saw or oscillating tool.

STEP 8: Test how the Vaask unit fits in the cutout hole to ensure proper fit. Adjust if needed.

STEP 9: Carefully remove painter’s tape.


COMPLETE ELECTRICAL INSTALLATION

Ensure that power to the installation site is turned off at the breaker box and locked out.

STEP 10, Option A: AC POWER

Electrical work should be performed by a qualified electrician.

Ensure that power to the installation site is turned off at the breaker box and locked out.

Loosen the four captive screws on the junction box cover and remove cover from box.

Insert the appropriate conductor through the appropriate junction box knockout. The included strain relief grommet is rated for between 12 and 10 AWG.

Attach the AC electrical power to the Vaask fixture’s power wires using the included WAGO connectors within the junction box as per national electric code to maintain basic insulation. U.S. standard wiring color reference below:

• Blue wire to white wire (neutral)

• Brown to black (hot)

• Green to green (ground)

For EU/IEC, connect like- to like colored wires.

Replace the electrical junction box lid.

Specifications
• Compatible with PoE standards 802.3af or 802.3at
• The device does not contain hardware for transmitting or receiving data. PoE is used for power only, not data.

STEP 10, Option B: POWER OVER ETHERNET

For Vaask units with a Power over Ethernet power supply: Rest the Vaask unit on the bottom edge of the wall cutout, then insert the PoE cable into the jack in the top of the unit.


MOUNT IN A STUD WALL WITH DRYWALL FAÇADE

STEP 11: Insert the top of the unit into the cutout carefully so that the cord or conduit does not snag on the cutout.

STEP 12: Using a level and a Phillips screwdriver, hand-tighten the screw in each of the four corners of the enclosure.

WARNING: Do not use an electric screwdriver or drill.

STEP 13: For AC power: Turn supply circuit power back on.

STEP 14: Flip the power switch on [-].


QUICK START

STEP 15: With the empty tank still attached, press the middle button inside the door to remove residual sanitizer from the tubing.

STEP 16: When the light on the front of the door turns yellow, unplug the tank by pressing the silver tab near the dip tube fitting.

STEP 17: Unscrew the refill cap on top of the refillable tank.

STEP 18: Fill the tank to the desired fill level with hand sanitizer gel made of 60% to 75% ethyl alcohol.

Fire code requires that the tank can be filled up to the following levels:
• 1.2 L in corridors and rooms open to corridors
• 2.0 L in rooms closed off by doors

STEP 19: Put the refill cap back on the tank and hand-tighten.

STEP 20: Connect the filled tank to the fixture by inserting the tube fitting into the connector. You will hear it click when connected properly.

STEP 21: Press the middle button inside the door to prime Vaask..

STEP 22: Once the light on the front panel stops blinking, place your hand within 4 inches of the dispensing nozzle to activate the pump and confirm that sanitizer is dispensing properly.

CLEANING VAASK’S EXTERIOR

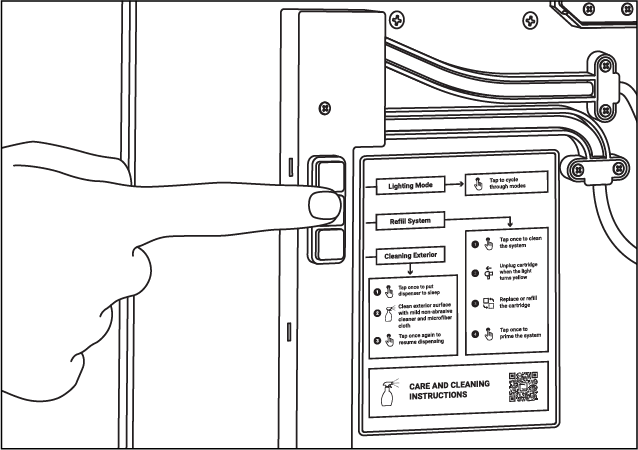
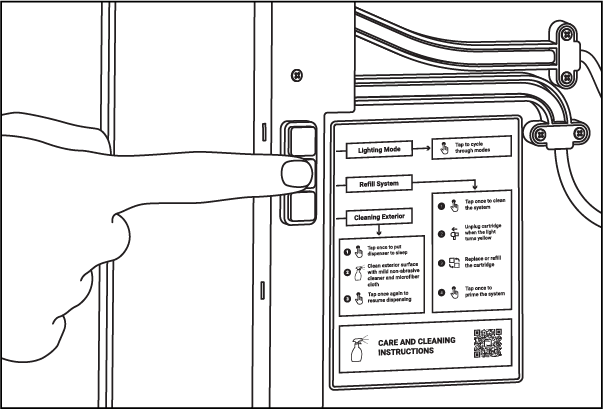
Clean exterior as needed with a microfiber cloth and warm water.

Do not use paper towels or abrasive/harsh cleaners. This will damage the finishes.

Shipping, Returns and Warranty Claims

Return Policy

Return Conditions for New Product Only

  • FOR PRODUCTS THAT HAVE BEEN INSTALLED, OR PRODUCTS WITH CUSTOM PAINT OR APPEARANCE PACKAGE, SALE IS FINAL AND NON-REFUNDABLE.
  • Customer must notify Vaask of the return within 45 calendar days of the ship date, as set forth by Vaask in its sole and absolute discretion. The customer must ship product back within 10 business days of receiving he Return Material Authorization.
  • An additional service fee and/or parts replacement fee may be assessed for any product that is rdamaged, including during shipment; is missing components; or has been modified in any way. Such fees and charges will vary based upon the actual material and labor costs necessary to repair the product, to replace missing, or modified parts, and to return the product to its original factory condition.

Instructions for Return of New Product

  1. To request a return, the customer may contact Vaask by phone +1 (512) 956-7687, by email (info@vaask.com) or by submitting a Return Material Authorization (RMA) request on vaask. com/returns.
  2. Once Customer Service determines the product’s return eligibility and calculated restocking fees, Vaask will provide the customer an RMA number and the address to which the product must be shipped.
  3. The customer may, in Vaask’s sole and absolute discretion, be responsible for shipping the product, including all insurance, freight, or other transportation charges, to the return address provided by Vaask. The product should be properly packed to avoid damage in transit. Vaask will not be responsible for such damage.
  4. Once Vaask receives the item, the company will inspect the returned items to ensure that it is not damaged and/or that no component are missing.
  5. The amount of the purchase minus restocking fee and original shipping charges will be credited to the billing account on the order.
  6. The credit will be applied to the balance of the billing account. If the balance is less than the refunded amount, the remaining funds will be refunded to the credit card used for purchase if applicable, or a check for the amount will be mailed to the address listed for the billing account on the Sales Agreement.

Warranty Policy

Instructions for a Warranty Return

  1. To request a return and obtain an RMA number, the customer may contact Vaask Customer Service by phone +1 (512) 956-7687, by email (info@vaask.com), or by submitting an RMA request on vaask.com/returns.
  2. Please use the return label supplied by your Customer Service associate.
    The return shipment address is:
    Vaask
    c/o Global Returns
    5811 Trade Center Drive, Ste 900
    Austin, TX 78744 USA
  3. Use the packaging for the replacement part to return the original part. The RMA number must appear on the outside of the packaging.
  4. If the part weighs over 50 lb. (22.7 kg), you will be provided a prepaid Bill of Lading. To schedule a freight pickup, please contact Customer Service. We will only charge freight costs if the original part is not covered under warranty.
  5. If the part weighs 50 lb. (22.7 kg) or less, please use the provided prepaid shipping label and schedule a carrier pickup or drop off the package at your local carrier’s office location.

5-Year Limited Product Warranty

Where Vaask, LLC (“Vaask,” “we” or “us”) has identified in or on product packaging or in a product website description that a Vaask-branded hand sanitizing dispenser has a 5-Year Limited Product Warranty (a “Qualifying Product”), then for that Qualifying Product, Vaask warrants to the original purchaser that the Qualifying Product will be free from defects in materials and workmanship under normal use for a period of five (5) years from the date of original shipment by Vaask of the Qualifying Product (the “Limited Warranty Period”), subject to the terms and conditions set forth herein. This is a limited warranty, and it contains specific exclusions and limitations. This limited product warranty is non-transferable and applies only to a Qualifying Product sold directly by Vaask.

If a qualifying defect arises and a warranty claim is received by Vaask within the Limited Warranty Period, Vaask will, at its option and to the extent permitted by law, ship new or refurbished replacement parts to the original purchaser at no charge or replace the Qualifying Product with a new or refurbished product at no charge. To the extent permitted by law, these are your sole and exclusive remedies for a product defect, and Vaask’s total liability shall not exceed the invoice amount to the original purchaser for the defective Qualifying Product. This Limited Product Warranty is valid only in the jurisdictions where the products are sold directly by Vaask and is valid only to the extent permitted by the applicable laws of such jurisdictions. Any replacement product will be warranted for the remainder of the original warranty period or thirty (30) days, whichever is longer, or for any additional period of time that may be required by applicable law.

1. How To Obtain Warranty Service
To obtain warranty service, you must contact Customer Service at +1 (512) 956-7687 or info@Vaask.com. Proof of purchase must be presented upon Vaask’s request.

In some cases, a Vaask Customer Service representative will schedule a trouble-shooting call with the customer to attempt to diagnose the problem remotely. Based on our remote diagnostics, we may choose to ship the replacement part(s) to the customer free of charge. We may ask the customer to send us the defective components for diagnostics, in which case we will cover the return shipping costs provided the customer follows our shipping instructions. If we send replacement parts, the customer will have the option to install the replacement parts (following our provided instructions) or schedule a repair appointment for Vaask or one of our authorized service providers to conduct the repairs at the customer’s location. If we are unable to diagnose the problem remotely, or if we otherwise determine that replacement of the product is necessary, we will ship a replacement product free of charge. In these cases, the customer may choose to schedule an appointment with Vaask or one of our authorized service providers to install the replacement product.

2. Exclusions And Limitations
This Limited Product Warranty applies only to the original purchaser of a Qualifying Product. Without limiting the foregoing, the Limited Product Warranty does not apply to any Vaask products and services other than Qualifying Products; non-Vaask products, even if included or sold with a Qualifying Product; or consumables (such as hand sanitizer).

THIS LIMITED PRODUCT WARRANTY DOES NOT APPLY TO DAMAGE TO A PRODUCT OR PART OF A PRODUCT THAT HAS BEEN SERVICED, ALTERED, REFURBISHED OR MODIFIED BY ANYONE WHO IS NOT AUTHORIZED BY VAASK, NOR DOES IT APPLY TO ANY COSMETIC DAMAGE SUCH AS DISCOLORATION, SCRATCHES AND DENTS. IN ADDITION, THIS LIMITED PRODUCT WARRANTY DOES NOT APPLY TO DAMAGE OR DEFECTS CAUSED BY (A) USE WITH NON-VAASK PRODUCTS; (B) ACCIDENT, ABUSE, MISUSE, MISHANDLING, FLOOD, FIRE, EARTHQUAKE OR OTHER EXTERNAL CAUSES; (C) NORMAL WEAR AND TEAR OR AGING OF THE PRODUCT; (D) OPERATING THE PRODUCT (I) OUTSIDE THE PERMITTED OR INTENDED USES DESCRIBED BY VAASK, (II) NOT IN ACCORDANCE WITH INSTRUCTIONS PROVIDED BY VAASK, OR (III) WITH IMPROPER VOLTAGE OR POWER SUPPLY; OR (E) FAILURE TO CLEAN THE PRODUCT IN ACCORDANCE WITH VAASK’S CLEANING GUIDELINES.

No Vaask agent or employee is authorized to make any modification, extension or addition to this Limited Product Warranty. This Limited Product Warranty shall be governed by the laws of the State of Texas, USA, without regard to any conflict of laws principles that may provide the application of the law of another jurisdiction. If any provision of our Limited Product Warranty is held to be unenforceable, such provision shall be severed and the remaining provisions will remain enforceable.